Vue 生命周期的理解

  我在学习 Vue 的时候,经常会接触到 Vue 的生命周期函数,常见的为 created 和 mounted,所以记录一下每个 Vue 实例在被创建之前都要经过的一系列初始化过程,例如,需要设置数据监听、编译模板、将实例挂载到 DOM 并在数据变化时更新 DOM 等。同时在这个过程中也会运行一些叫做生命周期钩子的函数,这个过程便是 Vue 的生命周期。

一、生命周期图示

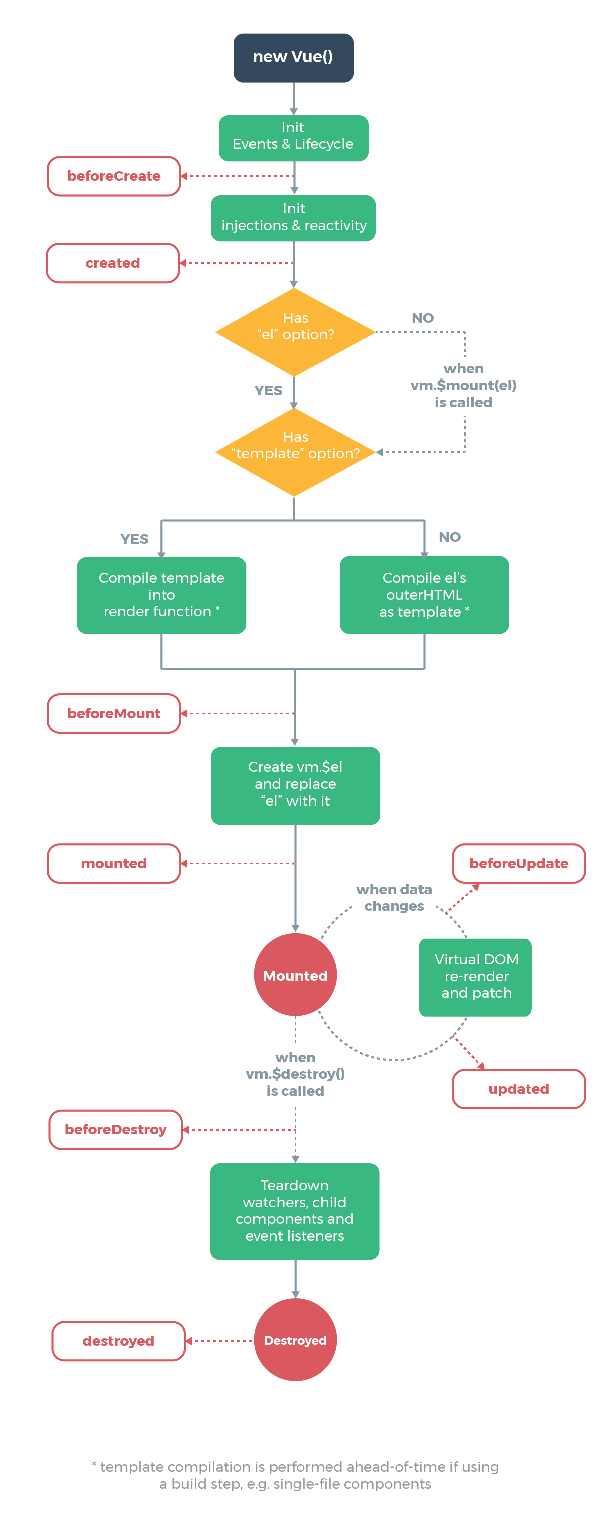
  上图展示了 Vue 实例的生命周期,官网上的原图,我在学习的时候也没有一下就弄懂这张图说的所有东西,但是随着 Vue 学习的深入,对这张图的兴趣越来越浓。可以看出,在 Vue 生命周期中有很多钩子函数提供给我们在 Vue 生命周期不同时刻进行操作。我们先在图上确认所有的生命周期函数,然后再依次理解。

  • beforeCreate、created          创建前后
  • beforeMount、mounted          挂载前后
  • beforeUpdate、updated          数据更新前后
  • beforeDestroy、destroyed         页面销毁前后

二、实际运行

  复制下面的代码,找一个可以在线运行 js 代码的网站粘贴运行,看看 console 打印的内容,便于理解生命周期的实际流程。

1
2
3
4
5
6
7
8
9
10
11
12
13
14
15
16
17
18
19
20
21
22
23
24
25
26
27
28
29
30
31
32
33
34
35
36
37
38
39
40
41
42
43
44
45
46
47
48
49
50
51
52
53
54
55
56
57
58
59
60
61
62
63
64
65
66
67
68
69
70
71
72
73
74
75
76
77
<!DOCTYPE html>
<html lang="en">
<head>
<meta charset="UTF-8">
<meta name="viewport" content="width=device-width, initial-scale=1.0">
<meta http-equiv="X-UA-Compatible" content="ie=edge">
<title>vue生命周期学习</title>
<script src="https://cdn.bootcss.com/vue/2.4.2/vue.js"></script>
</head>
<body>
<div id="app">
<h1>{{message}}</h1>
</div>
</body>
<script>
var vm = new Vue({
el: '#app',
data: {
message: 'Vue的生命周期'
},
beforeCreate: function() {
console.group('------beforeCreate创建前状态------');
console.log("%c%s", "color:red" , "el : " + this.$el); //undefined
console.log("%c%s", "color:red","data : " + this.$data); //undefined
console.log("%c%s", "color:red","message: " + this.message)
},
created: function() {
console.group('------created创建完毕状态------');
console.log("%c%s", "color:red","el : " + this.$el); //undefined
console.log("%c%s", "color:red","data : " + this.$data); //已被初始化
console.log("%c%s", "color:red","message: " + this.message); //已被初始化
},
beforeMount: function() {
console.group('------beforeMount挂载前状态------');
console.log("%c%s", "color:red","el : " + (this.$el)); //已被初始化
console.log(this.$el);
console.log("%c%s", "color:red","data : " + this.$data); //已被初始化
console.log("%c%s", "color:red","message: " + this.message); //已被初始化
},
mounted: function() {
console.group('------mounted 挂载结束状态------');
console.log("%c%s", "color:red","el : " + this.$el); //已被初始化
console.log(this.$el);
console.log("%c%s", "color:red","data : " + this.$data); //已被初始化
console.log("%c%s", "color:red","message: " + this.message); //已被初始化
},
beforeUpdate: function () {
console.group('beforeUpdate 更新前状态===============》');
console.log("%c%s", "color:red","el : " + this.$el);
console.log(this.$el);
console.log("%c%s", "color:red","data : " + this.$data);
console.log("%c%s", "color:red","message: " + this.message);
},
updated: function () {
console.group('updated 更新完成状态===============》');
console.log("%c%s", "color:red","el : " + this.$el);
console.log(this.$el);
console.log("%c%s", "color:red","data : " + this.$data);
console.log("%c%s", "color:red","message: " + this.message);
},
beforeDestroy: function () {
console.group('beforeDestroy 销毁前状态===============》');
console.log("%c%s", "color:red","el : " + this.$el);
console.log(this.$el);
console.log("%c%s", "color:red","data : " + this.$data);
console.log("%c%s", "color:red","message: " + this.message);
},
destroyed: function () {
console.group('destroyed 销毁完成状态===============》');
console.log("%c%s", "color:red","el : " + this.$el);
console.log(this.$el);
console.log("%c%s", "color:red","data : " + this.$data);
console.log("%c%s", "color:red","message: " + this.message)
}
})
</script>
</html>

运行后打开调试查看 console 打印的内容,可以看到:

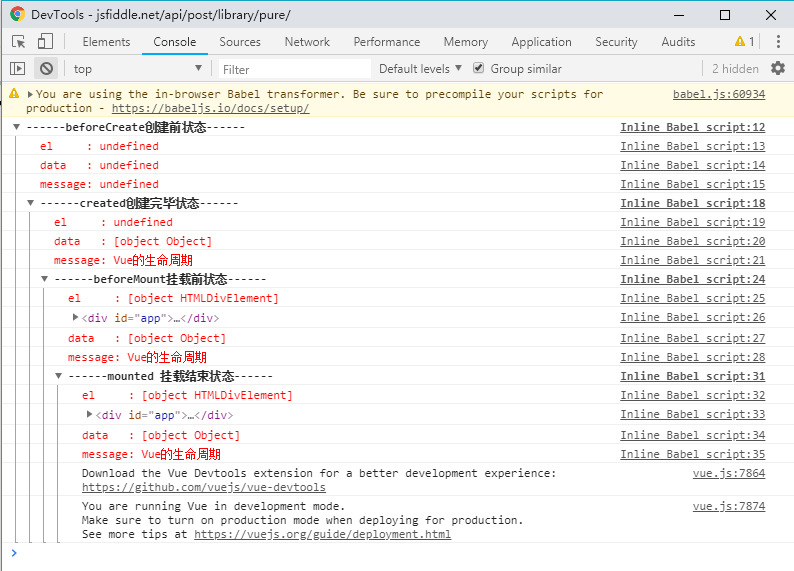
这样可以较为清晰地看到一个 Vue 示例在创建过程中调用的几个生命周期钩子函数。

三、钩子函数解析

  Vue 实例有一个完整的生命周期,也就是从开始创建、初始化数据、编译模板、挂载 Dom、渲染 → 更新 → 渲染、销毁等一系列过程,我们称这是 Vue 的生命周期,通俗说就是 Vue 实例从创建到销毁的过程。每一个组件或者实例都会经历一个完整的生命周期,总共分为三个阶段:初始化、运行中、销毁。

1、beforeCreate 和 created: 在这两个生命周期之间,进行初始化事件,进行数据的观测,可以看到在 created 的时候数据已经和 data 属性进行绑定(放在 data 中的属性当值发生改变的同时,视图也会改变);

2、beforeMount: 接下来开始找实例或者组件对应的模板,编译模板为虚拟 Dom 放入到渲染函数中准备渲染,然后执行 beforeMount 钩子函数,在这个函数中虚拟 Dom 已经创建完成,马上就要渲染,在这里也可以更改数据,不会触发 updated,在这里可以在渲染前最后一次更改数据的机会,不会触发其他的钩子函数,一般可以在这里做初始数据的获取;

3、mounted: 接下来开始渲染,渲染出真实 Dom,然后执行 mounted 钩子函数,此时组件已经出现在页面中,数据、真实 Dom 都已经处理好了,事件都已经挂载好了,可以在这里操作真实 Dom 等事情;

4、beforeUpdate 和 updated: 当 Vue 发现 data 中的数据发生了改变,会触发对应组件的重新渲染,先后调用 beforeUpdate 和 updated 钩子函数;

5、beforeDestroy: 在实例销毁之前使用,在这一步,实例仍然完全可用;

6、destroyed: 在 Vue 实例销毁后调用,Vue 实例指示的所有东西都会解绑定,所有的事件监听器会被移除,所有的子实例也会被销毁。

只需要记住在 Vue 的生命周期里有哪些钩子函数,它们分别是在什么情况下会被调用,以及其中的一些原理即可。

以上

随笔标题:Vue 生命周期的理解

随笔作者:刘先玉

发布时间:2018年09月25日 - 20:29:30

最后更新:2018年09月25日 - 20:29:30

原文链接:https://liuxianyu.cn/article/vue-life-cycle.html